Setting up a Real-Time Kinematic (RTK) GPS system can seem complex at first, but with the right guidance, it becomes manageable even for beginners. Whether you’re using it for land surveying, precision agriculture, drone mapping, or construction, a properly configured rtk gps system can dramatically improve positional accuracy. This step-by-step guide to setting up an RTK GPS system will walk you through everything you need to know, from required components to final configuration.
What is an RTK GPS System?
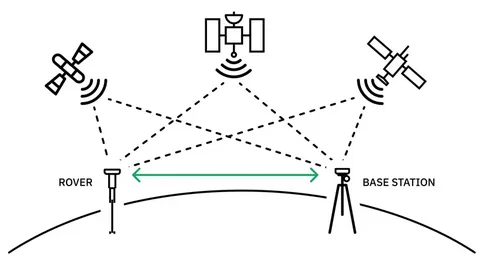
RTK GPS is a technique used to enhance the precision of position data derived from satellite-based navigation systems (like GPS, GLONASS, Galileo). Unlike standard GPS, which may have errors of several meters, RTK systems can achieve centimeter-level accuracy by using a base station and one or more mobile receivers (rovers).
Components You’ll Need
Before diving into the step-by-step guide to setting up an RTK GPS system, make sure you have the following components:
- RTK-enabled GPS receiver (rover)
- Base station with GPS
- RTK correction data source (via radio, NTRIP, or cellular network)
- Antenna(s) and cables
- RTK software or app for configuration and monitoring
Step 1: Choose Your Setup Type
There are generally two types of RTK setups:
- Local Base Station and Rover: Ideal for areas with no internet or cellular connectivity. You set up your own base station on a known point.
- Network RTK (NTRIP): Uses a remote correction service via the internet or mobile network.
Your choice will determine how you configure your system.
Step 2: Set Up the Base Station
If you’re using a local base:
- Mount the base antenna on a fixed, surveyed location.
- Connect the base GPS receiver and power it on.
- Configure the base to broadcast correction data via radio or over IP (NTRIP caster).
- Input the known coordinates of the base point into the system.
For network RTK users, subscribe to an NTRIP service and obtain credentials (caster IP, port, username, password).
Step 3: Configure the Rover Unit
- Mount the rover antenna securely on your drone, tractor, or survey pole.
- Power on the rover GPS receiver.
- Input the RTK correction source — either connect to your local base (via radio) or log into the NTRIP caster for corrections.
- Verify that the rover is receiving corrections (RTK fix status).
Step 4: Check for RTK Fix and Accuracy
Once the system is active:
- Monitor the RTK status in your software — you’re aiming for an “RTK Fix” status, which confirms high-precision positioning.
- Conduct a quick field test by measuring a known point.
- Adjust antenna placement or correction input if accuracy is not within expected range.
Troubleshooting Tips
- Ensure clear sky visibility for both base and rover antennas.
- Check firmware updates for both receivers.
- Confirm correct coordinates and datum settings (usually WGS84 or local grid).
Final Thoughts
Setting up an RTK system is no longer limited to high-end professionals. With decreasing costs and better software, anyone can achieve centimeter-level accuracy. This step-by-step guide to setting up an RTK GPS system ensures you can get started quickly and efficiently.
Whether you’re mapping a field, flying a drone, or laying out construction points, this step-by-step guide to setting up an RTK GPS system helps you unlock the full potential of GPS technology with enhanced precision. Just follow the steps carefully, and your RTK system will be up and running in no time.

